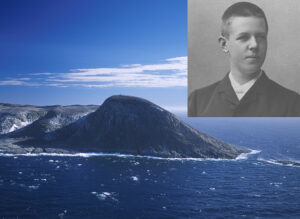
In 1888, Fridtjof Nansen and his team became the first to cross the Greenland ice cap. Sketches of their journey show sails mounted to their sleds to catch the katabatic winds. Even earlier, British explorers — who were, after all, mostly sailors — sometimes hoisted square sails on their cumbersome sleds for a boost.
It wasn’t until much later that power kites came along, and even more recently that polar travelers discovered them. In 1989, Arved Fuchs and Reinhold Messner used kites on their South Pole expedition. The kites –- big and rectangular with multiple lines that came back to the skier –- resembled more closely what is now referred to as a ski sail.
Other travelers soon picked up the idea. Borge Ousland used kites on his impressive 1996-7 solo traverse of Antarctica.
Improved technology has made kites even more useful. They now have a depower system — a way to shorten or lengthen select lines on the fly — which can fine-tune how much or little a kite grabs the wind. This increases the range of conditions that a given model can handle.
You can now tack into the wind, and all kites have advanced safety systems to let the skier kill the power almost instantly. Some manufacturers even make lightweight models specifically for expeditions. All these improvements allow a skilled traveler to cover far more distance than previously possible on skis.

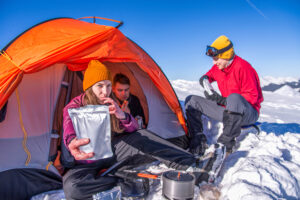
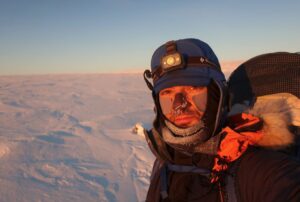
A well-bundled-up Sarah McNair-Landry in Greenland. Photo: Erik Boomer
I was first introduced to the sport by my dad, Paul Landry. While dogsledding to the Magnetic North Pole, he helped out a stranded kite-skier. Shortly after, he bought a small three-square-metre kite, and we started the long journey of teaching ourselves how to kite-ski. I remember my older brother Eric getting dragged behind the kite across the frozen Arctic Ocean: It’s one of my first memories of learning how to kite.

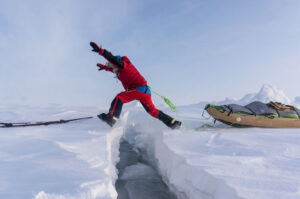
Eric and Sarah putting in big miles on the Greenland ice cap. Photo: Curtis Jones
Eventually, Eric and I not only became addicted to the sport of kiting on snow, water and land, but we also saw the potential to use the wind to travel faster and further than traditional manhauling expeditions.
Six crossings of Greenland and several Antarctica expeditions later have taught us that kites are particularly valuable on big ice caps with consistent katabatic winds.

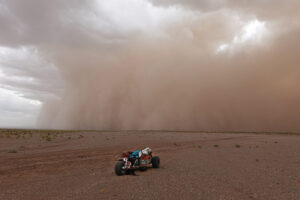
Kite-buggying across the Gobi Desert. Photo: Sarah McNair-Landry
But can kites also be used in rough terrain with inconsistent winds? We decided to try and used three-wheeled buggies and kites to cross the Gobi Desert. Our next challenge was a winter traverse of the Northwest Passage –- 3,300km of rough sea ice and land that we completed in 85 days. More recently, my companions and I hauled our kayaking gear 1,000km across Greenland with kites to complete a first descent of a wild, previously un-run river. My brother Eric even covered an impressive 595km in a single 24-hour day on one Greenland journey.
But don’t be fooled: Just because it’s fast doesn’t mean it’s easy! Every year, I teach polar training on Baffin Island and often get participants eager to learn kiting. But many quickly realize how hard it actually is and often decide to simply haul sleds the old way, with skis and manpower.

Greenland ice cap, with nunataks in the distance. Photo: Sarah McNair-Landry
How does it work?
Kite-skiing is very similar to other wind sports, such as sailing. Instead of on a boat, you are on skis, and your ski edge is your rudder. The sail floats 25m in the air on long lines that come back to a control bar, which clips into a harness around your waist, taking much of the force off your arms. Your hands then manipulate the control bar to move the kite in different directions and to generate more or less power.
The ideal winds are side winds and tail winds. It is impossible to travel directly into the wind with a kite. Instead, you need to tack by edging your skis and heading as far as possible into the wind. Then you pivot around and do the same in the other direction, zigzagging back and forth and slowing gaining ground upwind.

A calm evening in the Northwest Passage: time to pack the kite away. Photo: Sarah McNair-Landry
No wind days:
I wish these didn’t exist, but they do. On expeditions, it’s important to be prepared to haul your gear on skis to make extra distance on windless days or to move through terrain too rough to kite. We kite-ski in alpine touring (AT) gear and plastic boots, and can cross-country ski with this equipment on calm days. But AT gear is stiff and heavy, so if we expect to ski a lot on a trip, we also carry a set of light touring skis and boots for those unkiteable times.
Learning to kite:
Kite-skiing is really two sports combined, skiing and kiting. Being a strong downhill skier — or at least, able to balance, turn quickly and handle bumps on skis — is vital, as you are often traveling fast over sastrugi and choppy sea ice. The more comfortable you are on skis, the more you can focus on just controlling the kite. That’s challenging enough without having to worry about your feet at the same time.
Having experience in other wind sports (sailing, wind surfing, paragliding) gives you a head start in understanding the winds: where they are strongest and weakest, and the concept of tacking.
The kite is operated with a control bar: pulling the left side turns the kite left, and vice versa. Holding this bar all day is so cold that even with custom-made mitts, I tend to kite one-handed, regularly alternating to let circulation return to the free hand.

Working the control bar: if only it were heated. Photo: Erik Boomer
Dangers:
On expeditions, you often tack for days in one direction, body twisted slightly to one side, which eventually hurts the back. Kiting is even harder on the knees and equally taxing on gear: During our Northwest Passage expedition, all the equipment and food in our pulks got pulverized — bowls shattered, stoves broken, pots dented, food turned into powder. Our gear took a beating, and so did we.
Traveling fast also means that the chance of a group accidentally splitting up increases, especially on stormy days when it’s easy to lose sight of one another.
The biggest risk of serious injury is getting lifted up and thrown by the kite. More commonly, if you fall, the kite will drag you across the snow until you manage to reach the controls to down it. Injuries on expeditions are not uncommon: A solo explorer in Antarctica got knocked out and dragged by his kite for a while, and another skier in Greenland got picked up by his kite, flung to the ground and broke several ribs.
On my last expedition in Greenland, while kite-skiing on a windy day, I pulled my safety system to land my kite (which I do frequently when it’s very windy). However, the safety release malfunctioned. Instead of killing power to the kite, it fully powered it up, jerking me into the air and dropping me on my head. Luckily, I was wearing a really good helmet, but the fall still fractured a vertebrae.
If you remember only one thing from this article, it should be: Always wear a helmet!
Kite gear:
We use different sizes of kite for different winds. I usually bring three to four kites on an expedition. Our small, 6-square-metre kites are great for strong winds, while big, 18-square-metre kites on long lines excel for the light wind days.
The size of kite depends on other factors than just wind speed. The weights of the skier and pulk influence the size needed, as does the snow surface (hard-packed vs soft, deep snow).
The kites clip into a harness that is worn around the waist and includes leg straps (different harnesses exist).
There are many brands of kite. Because more people like to hang out on a beach than in cold, windy places, the most common kites are made for kite-surfing on water. Foil kites (same technology as a paraglider) for land use are light and great for expeditions. My own favourite brand is Ozone; I’ve used them on most of my journeys.
Expect to pay over $1,000 per kite. The bigger the kite, the more expensive.
Pulks:
There are many pulk options. Paris Expedition pulks are by far the cheapest, and they work great. My tip is to have two sleds tied side by side to avoid the sled fishtailing or rolling.
Note that sleds often get caught on chunks of ice and jerk you off your feet. I do not like a rigid pole system, but prefer a rope that runs from my pulk to the back of my kite harness. I attach a bungee into the pulling trace to make it easier on my back. If you stop quickly, make sure the sleds don’t run you over.

Eric McNair-Landry in the Northwest Passage. Deep water, small tides mean no buckled ice along shore. Photo: Sarah McNair-Landry
Ski boots: Plastic ski boots are not warm. I often use a thick inner boot (my favourite is the Intuition liners) inside my boots, and an overboot for even more warmth. Mountaineering-style boots, such as the Millet Everest Boot, can also be used with the right bindings, but give less ankle support.
Clothing: Big warm mitts are crucial, as your hands are above your head to steer the kite. Kite-skiing is cold, since we are not generating as much heat as cross-country skiing, and because we are always traveling on windy days. I wear several extra layers for kite-skiing.
Navigation:
My favourite way to navigate on kite expeditions is to use the sun and the wind. In the northern hemisphere, for example, the sun is always due south at noon and moves 15 degrees an hour. When the sun is not visible, I use the direction of the wind to hold a bearing. When I need more precision, a compass strapped to my wrist and a GPS around my neck allows me to check my bearing at a glance.

Photo: Erik Boomer