A personal account of a climb up Mount Everest: A step-by-step, camp-by-camp, feeling-by-feeling guide of what it’s like.
In the early 1990s, Tom and Tina Sjögren, the founders of ExplorersWeb, had a dream to climb Everest. It took them four tries.
Their second attempt, in 1996, was particularly harrowing. That was the Into Thin Air year when a vicious storm caught climbers on their summit push. T&T, as they’re widely known, were safely acclimatizing in Camp 2, but eight others higher up the mountain died. Finally, in 1999, T&T returned to Everest and reached the top.
The enterprising pair have since sold ExWeb and moved on to other things, but one of the first pieces they wrote for the site was a camp-by-camp, landmark-by-landmark, feeling-by-feeling guide to Everest’s south side route.
Since the Everest season is just around the corner, we’ve decided to republish this original piece. Although a few things have changed — Camp 1 is rarely used these days, and the 2015 earthquake in Nepal drastically altered the Hillary Step — but their 20-year-old account is still largely what a would-be Everest summiter will experience.
Maybe you’re training for Everest, or simply dreaming of the highest point on Earth, the “closest frontier to the universe”. This is for you.
The Route
Everest is our tallest mountain. It is difficult enough to have killed many climbers in horrible falls and deep crevasses. Its altitude and the technical aspects of the climb are not to be underestimated.
The Death Zone above Camp 4 has taken many strong and skilled climbers’ lives. That implies that Everest requires intensive training. You might be lucky and the climb will well even if you didn’t do your homework. But you will certainly notice that Everest lives up to its fearful reputation if conditions turn against you.
Everest is also an extremely beautiful mountain. And just as we continue to launch ourselves into space, even though missions sometimes end in tragedy, mountaineers will always try to climb Everest to experience its majesty and beauty.
Base Camp
5,400 m/17,700 ft
Base Camp is like a Formula One car racing depot. Satellite phones buzz in international tents as the world’s languages mix in thrilling accounts of the latest news. Journalists, families, and climbers exchange information and emotions between the mountain and the world. For no alpine peak fires imagination like Mount Everest.
You wear the latest tech gear, but you wash your clothes in frozen lakes. Drying, the damp clothes freeze into strange ice formations at night. The same happens to your wet hair. And your toothpaste. You finish your meal quickly, for it immediately cools on your plate. You eat buffalo meat. It’s fresh until it starts to smell. Then you wait. After a few weeks, the odor vanishes. At that point, your BC Sherpa cook starts to include it in your diet again, as a very special buffalo jerky.
You listen to the frequent avalanches coming down Nuptse, Lho La, and Pumori. You throw silent glances at the Icefall and listen as it collapses with a horrendous crash. Base Camp is a place of hope, fear, frustration, conflicts, and lifelong friendships. Some climbers fulfill their dreams, others have to return home with an unfinished task. You’ll look around you and try to guess.

Arriving at Everest Base Camp. Photo: MEC.ca
Icefall
5,500m-6,100m/18,000 ft-20,000 ft.
This place is similar to a huge horror chamber at an amusement park. Only this one is for real. Countless scary things can happen here.
A crevasse might open under you. An ice pinnacle can fall on top of you. The entire area can collapse. It’s simply not a place for a picnic, and most of us just concentrate on getting out of there as quickly as we possibly can.
Be sure to always clip into the ropes. But also to unclip fast if an avalanche strikes. Should that happen, take cover behind a wall or a pinnacle. Jump into a crevasse as a last resort. Even a small avalanche may hurl huge ice boulders at you. Watch carefully for ice pinnacles poised at a nasty angle. Do definitely not have your snack break below one of these. They snap in a second.

The Khumbu Icefall. Photo: Wikimedia Commons
Check the ropes and the screws before stepping onto a ladder. Cross the ladders slowly and carefully. Try to fit your crampon between two rails. Sometimes, a nearby avalanche or heavy wind sets the ladder in motion. Just stay calm and focus on each step and you’ll be fine. It helps to lean on the ropes, either backward or forward, depending on the angle of the ladder. The ropes are slack, so leaning on them stretches them and provides a better balance. Even more helpful is if your climbing buddy stretches the ropes for you while you cross the ladder.
Occasionally, you encounter a large wall of ice. Those walls are usually roped; use your jumars. Climb the ropes by kicking your crampons into the ice and then lean on your legs. Don’t hang on the rope, it is exhausting and dangerous.
Climb the Icefall early in the morning. Climbers usually head out at 4 to 5 am. Don’t leave BC later than 6 am. The Icefall thaws later in the day and avalanches become more frequent. Plus you’ll boil.
(Climb time: 5-8 hours not acclimatized, 3-5 hours after acclimatization)

Climbing ladders in the Khumbu Icefall. Photo: Madison Mountaineering
Camp 1, Valley of Silence
6,100m-6,400m/20,000-21,000 ft.
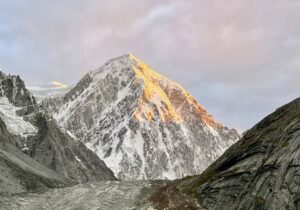
This is a vast, flat area of endless snow, deep crevasses, and mountain walls frequently washed by avalanches. Here we set up Camp 1. At night we listen to the deep, murmuring, cracking sounds under our tents. It is the crevasses opening and closing deep in the glacier beneath. You keep your fingers crossed that it won’t happen right under your tent. At least not just now, while you are in it. Pounding headaches torture you. But it is here that for the first time, just a few steps around a corner, we gain our first close sight of Everest.
Be sure to set camp away from tiny cracks, those possibly hiding the mouths of large crevasses.
Climb this area clipped to the fixed ropes since crevasses lie hidden everywhere under the snow. You could remove your crampons on this climb. Sometimes, weather can make this usually easy part difficult, because of deep snow and whiteouts. Always start out in good time. Stay away from the walls, they avalanche frequently. Later in the season (end of May), this snowy area starts to turn rotten and can turn quite nasty.
(Climb time: 4-7 hours not acclimatized, 3-5 hours after acclimatization)

Today, Camp 1 is rarely used because of its exposure to avalanches coming down the Western Shoulder. Photo: Post Independent
Camp 2
6,400m/21,000 ft.
After an endless, slow march through the silent valley, you reach at last a rocky patch, at the foot of the icy Lhotse Wall. This marks Camp 2. This place is absolutely stunning. Clouds roll in from the lower ranges of the Himalaya, up the valley, and into camp. While acclimatizing, we spend time looking for cool old climbing gear, left here by all of Everest’s climbing history. This is also the last chance to get a decent, prepared meal. We eat all we are handed because soon we’ll be surviving on instants only.
Don’t camp too close to the Everest face, since it avalanches once in a while. Although tempted to idly hang around camp, force yourself to take walks to the Lhotse face. It will speed acclimatization and relieve altitude problems. The walks force you to breathe deeper and faster, thus saturating your body with more oxygen.

Camp 2. Photo: Madison Mountaineering
Camp 3, Lhotse Wall
6,800m-8,000m/22,300 ft-26,300 ft.
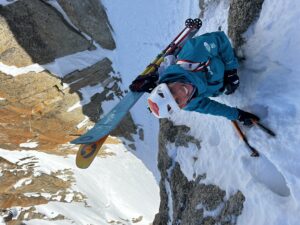
Imagine sliding down a fun, icy slope on a sunny winter’s day. Only this one is 1,200m high. This is not a place to play. The dangerous part is hanging onto ropes of dubious strength and changing carabiners between the ropes. You might feel not too clear in your head, especially coming down, but it’s crucial to concentrate. One slip and you are gone.
The camp here is a true eagle’s nest, placed right by the wall. Dressing and securing yourself in order to go to the toilet at night is a tedious task. Just finding a spot for it on this narrow platform is tricky enough. But the view is grand, and by now you are well on your way to the summit.
The climb towards the wall is a flat walk that gets you nicely warmed up. At the wall, you step into the ropes, and the icy incline begins immediately. After an hour or so, you reach the “Ice Bulge”. After that, it is a pretty uneventful, steep ice climb to C3. Occasionally, you hear a howling sound and watch rocks catapulting down the wall. Blocks of ice sometimes come falling behind climbers. Watch your head, lean on your legs (not the rope) and rest on the lines only occasionally.
The climb will be either easy or hard, depending on the weather. A dry, cold season means sheer, blue ice. Keep your crampons sharp. Deep snow makes the climb easier but increases the risk of avalanches.
After C3, you will traverse the wall towards the Yellow Band and the Black Turtle. These are rocky sections on the wall, secured by a tangle of old and new ropes. Check the ropes well and watch for rockfall from climbers above you. Another traverse takes you to the foot of the last wall to C4. This part is steep but not very high and soon you’ll put your nose above its edge, thus entering the land of the spirits, the Death Zone.
(Climbing time: 5-8 hours not acclimatized, 4-6 hours acclimatized.)

Climbers on the Lhotse Face. Photo: Andy on Everest blog
Camp 4, the Death Zone
8,000m/26,000 ft.
Camp 4 sits on a plateau resembling a moonscape. You are at the edge of the atmosphere, and the sky owns a strange, dark blue color. It is surely the closest you can get to space on earth.
Only a small climb above camp, you look down the Tibetan plateau with its vast brown plains, white glaciers, and views of the other alpine giants — Kanchenjunga, Lhotse, Makalu — in the distance. It’s all magic and unreal.
Yet, this is also the place where the fame and fun of BC are definitely gone. Only fear remains on everyone’s face. People don’t talk a lot. Resting in your tent, feeling weak already, you try to get some sleep as night falls. In a couple of hours, you will start to put on your gear for the final part of the adventure — the summit push.
The wall towards the summit is steep and dark, you are in the Death Zone, and you can’t help thinking that there is a very real risk that you might not survive the next 48 hours.
Go over your gear in daylight. Have everything neatly organized. Drink at least three litres of fluid, more if you can. Bring another two litres of hot fluid on the climb. Get your ax ready. You will feel great as long as the day is bright but will lose spirit quickly when night falls. The cold, scary darkness outside is anything but inviting. The wind rustles the tent. You will probably not be able to sleep a wink. Take it easy. As soon as you start out on the climb, you will feel much better. Fear is always worse than reality.

The South Col at 8,000m, with the summit pyramid behind. Photo: Wikipedia
The summit
8,850m/29,035 ft.
Finally, the hour has come. Around 11 pm, we put on the final gear and step out in the night. There, in the distance, we can see a worm of light slowly moving up a dark wall. Its climbers’ headlamps flickering in the dark. It’s completely silent. Nobody talks. If you do, you whisper. It is absolutely terrifying and you climb and climb, awaiting the first ray of dawn. It’s desperately cold. It’s steep and at times very icy. The ice ax and the crampons barely cut into the ice. You need to pee. Forget it. Someone turns around. “Can’t go on, good luck.”
A cold, white moon rises from below, but you hardly glance at it or even the bright twinkle of the universe above. The adrenaline keeps your body moving. And then, suddenly, after hours and hours of despair, you notice a thin blue beam of light on the horizon. Sunrise! If you are lucky, now is the time for the fabled mountain ghost. The mountain projects itself onto the morning fog. The shadow towers in front of you like a giant mirage. Beneath lies the world in all its glory, glowing in the rising sun. You feel the warmth and all hope returning.
You kick your feet to beat the oncoming frostbite. You are at the Balcony, having a short rest, changing to a new oxygen bottle. A ridge lies ahead, and just above, not far at all, is the South Summit. You begin to enjoy the view and the possibility of success. Finally, you step up onto the small plateau of the South Summit, and there — just around the corner — is the Everest summit itself!
You have watched it so many times from the distance, and suddenly it is so strangely close. Just right there, only 95m away. You can almost touch the white tail of snow.
When you reach the South Summit, you are just a couple of hours from your dream come true.
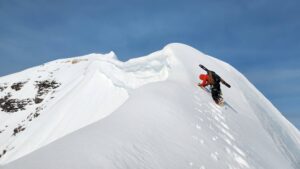
But there is one more obstacle in your way. The Knife Ridge. You will gasp upon seeing it. It is steep and looks truly nasty. The ridge towers almost freely over Nepal and Tibet. It’s sharp and very steep. The Hillary Step is in the middle somewhere, a rock climb in the sky.

Between the South Summit and the Hillary Step. Photo: Charlie Mace
You step onto the ridge via a small, half-open tunnel from South Summit. You climb with your crampons at a sharp, crooked angle towards the side of the ridge. Occasionally, the snow gives way and you slide down for a hairy second. This is not a place to climb without fixed ropes. Clip in carefully, focus on each step, and keep moving.
If there is a lot of snow, the ridge could be almost wide and quite nice. We had a dry, sharp climb.
The Hillary Step was, in our opinion, not too bad. Although very exposed at parts, the climb is fast and feels safe. The danger is getting tangled in the ropes. Bring a good knife. Check the ropes well for strength.
After the step, you will spot white, strange wave-formations of frozen snow pointing out from the summit. Keep climbing towards them. This section is usually unroped, yet not too steep. Still, be careful and use your ax. You might eagerly look for the summit now, yet all you’ll see is a white edge on the horizon. You will not know how far you have left and feel frustrated and tired.
Then you reach another white edge, but this time it doesn’t continue. Behind it, there is instead a slope down. You are peeking down at the North Side of Everest. You have reached the summit, friend.
(Climbing time: 8-16 hours)

How to select a summit picture. Let’s just go for the first one, of Tenzing Norgay by Edmund Hillary.
Coming down
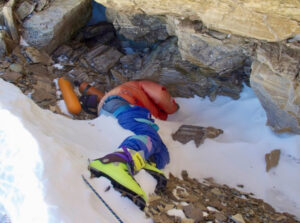
Most accidents occur upon climbing down. Be sure to have enough oxygen to come back. Don’t relax for one moment. The climb is tricky all the way down to the South Col. Even the wall after the Balcony is dangerous if unroped. You will encounter a couple of bodies of deceased climbers here. On one of our previous attempts, the last part of the wall toward C4 was not fixed and eight people took pretty bad falls. Luckily, all the climbers survived. We climb this part roped to each other if the fixed ropes aren’t there. If the weather turns bad, the fixed ropes might get buried or you won’t be able to see them. Make memory maps on your climb up for this situation. Bring a compass.
A blue ice bulge will mark the last obstacle back to camp. There are some crevasses there, usually recognizable as streaks of white snow. Avoid them.
Finally, you will stumble back down onto the flat, rocky South Col. And take the last exhausted steps towards your tent, throwing yourself into it. And now, after almost 30 hours of strenuous climbing, terror, and doubts, you’ll fall into the deepest and happiest sleep of your life.
Exceeded only by your awakening in the morning: The sun’s rays softly warm you, as you slowly come to a wonderful, triumphant realization, that you actually, really, really made it.
You are an Everest summiter!
(Climbing time: 4-8 hours).

Sweet summit celebration in Base Camp. Photo: https://www.seb27.com