Although I’ve done many expeditions to both the North and South Poles, both as an independent traveler and a guide, every fresh trip brings up new gear ideas. There are also old, tried-and-true standards that I have used for years. As I begin the South Pole season, let’s take a look at my gear. Today: Cooking setups for polar travel.
One note: Proper gear is just one aspect of polar travel. Developing skills, planning and logistics, understanding the polar environment, and knowing how to minimize risk are all equally important. If you would like to fast-track your development as a polar traveler, consider hiring an IPGA guide.

MSR’s XGK EX stove.
Stoves
In the polar regions, most of us use MSR’s XGK EX stove for melting water. Though noisy and not easy to fine-tune if you want to make a delicate soufflé, it’s fast and reliable. But there are ways of making it work even better.
Rather than using a heat exchanger or other add-on (most of which increase carbon monoxide production), I use a paneled windshield as a heat reflector and safety barrier. These are superior to the windscreen supplied with MSR liquid fuel stoves and only marginally heavier. The air vents at the bottom deliver the right amount of oxygen and sit nicely over the fuel line.

I mount the XGK stove with bolts and wing nuts, along with the fuel bottle to a board covered with aluminum tape to create a stable system. Though secure, the stove removes easily for deep servicing. A second board insulates the hot kettle and other pots. I also have a fire blanket and spare pump with every stove.
We transport the stove, boards, blanket, spare pump, service kit, laminated instructions, and up to three bottles in a custom-made bag.

The stove bag and gas.
I also use a couple of quirky hacks.
The first is a device (originally for hanging decorative plates on a wall) that I use on all our kettles to lock the lids during transportation. If your pot travels with its lid firmly in place, it will preserve the rim seal, you’ll emit less steam into the tent, and use less fuel.
https://www.facebook.com/743083980/videos/pcb.10159402671813981/686174366272243
The second is a fuel float I designed recently and will try out on my next trip. On our guided expeditions, it’s not unusual to refill 10 or more bottles at once. I find the use of a funnel annoying because I am constantly stopping, pulling it out, and checking the level. And overfilling is a pain. It needs a steady hand (you should use a spill mat) and is probably not useful in windy conditions, but it’s otherwise a one-stop shop for refilling bottles. Another solution is to fill bottles with a measuring jug.
https://www.facebook.com/743083980/videos/pcb.10159402671813981/678694540188228
I’m interested to know how much fuel people use on an expedition where the tent benefits from solar tent warming e.g. in Antarctica. I have reduced it to 175ml per person in a tent of two people, catering for 24 hours of water needs.
Did you know, 1L of white gas weighs 670g, almost 300g less than the same amount of water?
Stove pumps and stove safety
The International Polar Guides Association (IPGA) recently published a document on Stove Safety Management. These guidelines, which are only available to members, are a collaborative effort summarzing anecdotes across our membership. It includes intel from hundreds, perhaps thousands, of trips.
We discussed at length MSR’s Arctic Pump, which is compatible with their XGK-EX and WhisperLite stoves. It’s distinguishable by its blue collar. (The standard pump is red.) Introduced in 2017, the Arctic fuel pump has specific components that tolerate lower temperatures. The collar (which screws onto the bottle) is made of a more pliable material that becomes firmer as temperatures drop and is resistant to shrinkage. This creates a more consistent seal between the pump and the bottle.

MSR’s Arctic Pump.
All O-rings in the Arctic pump are made from a different compound and shouldn’t be interchanged with the standard pump. It also has a leather plunger cup (instead of rubber on the standard pump). This is less prone to damage in extreme cold. However, it does require more oiling and shaping to give consistent pressure during pumping.
Here is my personal experience with the two pumps. The standard pump is excellent in most conditions but can leak from the collar in severe cold, even when in operation. I have experienced this leakage at -25°C and colder. Even a pre-warmed pump will cool down during operation because it’s shielded from the warmth of the stove. You should regularly check for dripping below the collar, wipe and smell it. If it’s leaking, immediately shut the stove down and replace it with the Arctic pump. Be sure to swap back to the standard pump if the temperature abates.
For each stove on our Arctic trips, we carry a spare standard pump and an Arctic pump. Because O-rings are not interchangeable, spares should be carried for each pump type.
Because of solar tent warming, I have never needed to use an Arctic pump (and never supplied one) for expeditions during the typical Antarctic season.
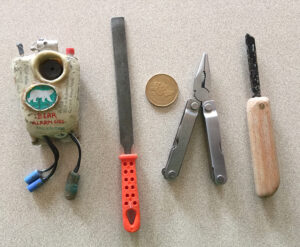
If you have never dismantled a stove pump, or indeed a stove, then do it before your next trip.
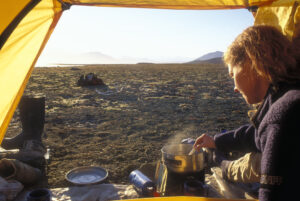
Kettle
Finally, here’s a look at the type of kettle I’ve been using successfully for 10 years or so.
Made from aluminum with a steel wire handle, these 2.8L ‘billy teapots’ are readily available in general camping stores foe about $20. Don’t get the steel ones, the bottoms burn out.
These kettles are straight-sided and flat-bottomed. They don’t overhang the spreaders on an MSR XGK stove. These features all minimize carbon monoxide production. The spout, of course, is awesome for filling thermoses.
I modify them by adding a notched handle to the wire for single-hand pouring and put some thread locker on the lid handle bolt. A poor lid seal will increase escaping steam and fuel usage so I take care to protect my kettles. For my upcoming trip, I’ve made protective boxes out of the original packaging, covered in reinforced aluminum tape. The kettle weighs 256g, the box weighs 208g.

A kettle in its protective box.
Some kettles on our arctic programs have melted hundreds of kilograms of snow and traveled over 2,000km in sleds. Out of the 12 or so that I have in service, I’ve had one leak. I repaired it with a kneadable polymer repair compound. Keep 5 grams of it in your repair kit: It’s excellent for sealing cracks in almost anything, metal included.