Although I’ve done many expeditions to both the North and South Poles, both as an independent traveler and a guide, every fresh trip brings up new gear ideas. There are also old, tried-and-true standards that I have used for years. As I begin the South Pole season, let’s take a look at my gear. Today: sled traces.
One note: Proper gear is just one aspect of polar travel. Developing skills, planning and logistics, understanding the polar environment, and knowing how to minimize risk are all equally important. If you would like to fast-track your development as a polar traveler, consider hiring an IPGA guide.
Traces

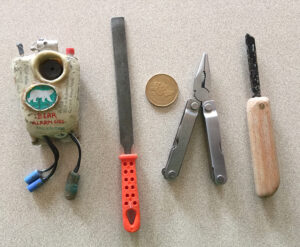
Red loop is for hauling, blue-and-white rope are handles to horse the sled over obstacles. Photo: Eric Philips
Traces are lines used to pull a sled. There are lots of different rigs. Here’s what we do.
First, the sled should have two connection points (tow loops) on either side at the front. These should be 6mm-8mm Spectra, static climbing rope, or double-braided yachting rope. We secure these with simple knots on the inside, bolstered if we are traveling on glaciers.

Negotiating a pressure ridge en route to the North Pole. Photo: Eric Philips
For Arctic Ocean expeditions, we use a V-trace system. Because the hauling rope can be useful for other purposes, we attach it to the tow loops with carabiners to make it removable. Here, the trace should be 10mm-12mm waterski rope, which doesn’t absorb water and floats.

The V-trace system for sea ice. Illustration: Eric Philips
The waist belt on your pulling harness should have integrated D-rings on either side, with a hauling loop connecting one to the other. There is no need for carabiners here. We use 6mm Spectra or climbing webbing for this line.
To relieve the tugging on our harness, we make a loop from an 8mm bungee cord. It connects the V and the harness with a carabiner or loop. We call it the Download.

A skier shows the V-shape while skiing to the North Pole. Photo: Eric Philips
The Download should run free on the harness loop so that your load is always equalized between both D-rings. Whether you pull forward or from the side, the pressure is always on both hips. Use keylock carabiners to avoid annoying snags when disconnecting from your trace. After all, it’s behind you and you usually do it blindly. Always place double bends in your ropes for longevity when connecting to carabiners.

Key lock clip gates are best.
On rough sea ice, where there are so many obstacles, you don’t want your sled too far behind you. It should follow your tracks as closely as possible. Just check that your ski tails don’t touch the sled when you’re fully stretched out. We place a knotted handle in the trace, which is convenient for manhandling your sled over pressure ridges.
Trace configuration options
I use a different trace configuration when traveling on long, flat snowfields.

Illustration: Eric Philips
On the sled, I attach a short rope from one tow loop to the other. It should reach over the nose of the sled, above. No need ever to remove this during the trip, just tie it in on both sides, carabiners not needed. Then tie a single line into the middle. It shouldn’t slip from this midpoint. This line can be varying lengths, from 2m to 4m on an icecap, 4m to 10m in crevassed terrain, and up to 20m if kiting. You can place knots along this rope, which could catch the edge of a crevasse in the event of a plunge. Then connect this rope to your harness loop with a carabiner, letting it run freely on the loop.

Photo: Eric Philips
If you do fall into a crevasse and your sled doesn’t follow, your trace system should be strong enough to hold your body weight. Therefore you need your Download bungee loop in parallel rather than in series, meaning that if the bungee breaks, the rope will still hold. See below for different ways we use our Downloads.

Bungee in parallel, for traveling on glaciers.

Bungee in series.
Solid traces and breaking
If the route includes steeper downhills, so your sled often glides under gravity, consider using rigid traces. This can simply be two single bars, but I find that the sled is more responsive using a rectangular system with a central crossbar.
Every fixture should be as rigid as possible: corners, joints, and the connection to your sled. I do, however, connect to short bungee loops on each hip to deal with jerkiness.

Skiing with solid traces in the Australian Alps. Photo: Eric Philips
On our Aussie Alps trips, we use 19mm polyethylene electrical conduit with a rod doweling insert. Because of their strength and bendiness, they create a built-in crash dampener on steep slopes. The entire system flexes when you come to a sudden halt. On long trips with heavier sleds, increase the diameter of the conduit. Don’t use polypropylene — it’s too brittle.
Finally, when it’s really steep, we revert to the “lawnmower technique”, flipping the bars over and walking them down in snowshoes. Make sure the bars are tethered to you in case you accidentally let go!
Sled brakes
If you have intermittent downhills that don’t warrant a rigid system, you need a braking mechanism for steep slopes to prevent the sled from nipping at your heels or bowling you over. Sure, you might be a gun skier and manage to stay in front of your rocket, but you have little control over its speed or direction. Things can go bad quickly. Skiing with your sled in front, like walking a dog, is rarely a good option.
On steep descents, we clip a short line between the sled tow loops and let this loop drag under the sled. Super-easy and reliable. For mild slopes use a thin cord; for greater stopping power, use a thicker line, and add knots for greater resistance. The key is to find a happy friction.
To make this system usable on the go, attach a lanyard to the middle of this loop and tuck it into your harness belt, releasing it to allow the brake loop to deploy under the sled.
The final method is tobogganing. We do this a lot in Svalbard, steering with skis and emergency stopping by throwing the trace loop over the nose. Freaking fun, but you need to be confident of the terrain ahead.

If you are feeling confident, tobogganing is an option.