I used to feel that there wasn’t much to learn about hauling a sled. It’s just walking, isn’t it? What’s to say? But many partners disagreed with me. “There’s really a lot to learn,” said my Inuit friend, Noah Noggasak, during our 550km sled trip across northern Labrador.
So I’ve accepted that I must have picked up many techniques unconsciously, through thousands of hours of manhauling over 20 sledding expeditions. On my first trips, I’m sure that I was as inefficient as every other beginner, without realizing it. Then gradually, I became better, also without realizing it.
So what’s to learn? I began to observe less experienced partners and came up with these tips to shortcut the learning process.
A quadruped hauls better than a biped

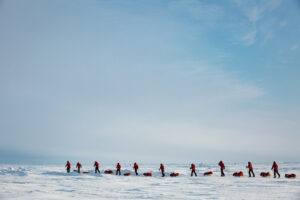
Stands to reason, because dogs are the ultimate sled haulers. But most novices haul like two-legged creatures. They only use their ski poles as delicate feelers rather than as third and fourth legs. You must push hard with your ski poles. This drives you and the sled forward and takes a lot of the strain off the legs. Proper ski pole use keeps the legs fresh longer, allowing longer hauling days. At the end of a long expedition, your triceps should be as well-developed as your legs.
Use gravity to get over obstacles

Another technique to prevent the legs from tiring prematurely. Sledders must often haul their heavy sleds over low bumps such as sastrugi or pressed-up sea ice. It’s a strain to do it with the leg muscles. Instead, haul normally until the sled begins its short climb, then ‘fall’ forward, straightening the legs and using your weight to lever the sled over the bump. Just as the sled reaches the fulcrum, start hauling normally again, so you don’t actually fall forward. With practice, you can do this smoothly, without any hitch in your stride.
Skiing vs walking

Most manhaulers use skis to support themselves on snow but they don’t actually ski. They shuffle with boards on their feet. Skiing is quite technical and it’s about maximizing the few centimetres of forward glide between strides. A very good skier can bring this glide to manhauling. Over the weeks, the extra distance can add up to hundreds of kilometres.
If you’re not such an expert, walking can be faster and easier than skiing, if the snow is hard enough. In the polar regions, wind and cold transform powder snow into a hard surface. Sometimes it’s so hard that the metal tip of a ski pole barely makes an impression. On this sort of snow, it’s faster and more efficient for most people to walk. For one thing, you don’t have a 1.5kg board on each foot. For another, skiing cadence is always slower than walking cadence. (See below for more on cadence.)
In some places, the snow is so wind-packed that you never punch through. Elsewhere, especially when snow has recently fallen and the wind has not yet had time to pack it down perfectly, the footing is uneven. An experienced sledder is sometimes able to read where the hard snow is, and by twisting and turning, to avoid breaking through.
The upwind side of sastrugi, for example, (left in the photo below) is harder than the downwind side (right). In this shot, both sides are firm enough for walking, but sometimes the upwind side is okay while the downwind slope is not.

Snow quality can change rapidly in a short time. When you break through too much while walking, so that progress gets frustrating, put on skis. When the snow seems hard again, doff the skis and try walking. This means having ski boots that are light and comfortable for walking.
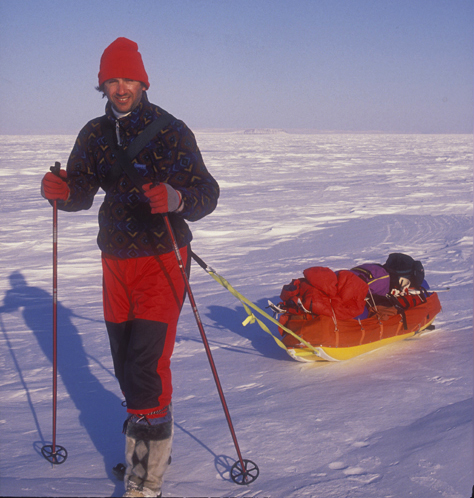
Because I prefer walking where possible, I’ve always used Berwin-type bindings with soft mukluks or even Inuit sealskin kamiks — the world’s lightest and most comfortable footwear. But proper NNN ski bindings and boots are more efficient if the snow is too soft for walking and you’re mostly on skis.
Skis vs snowshoes

Use skis in open country where the snow is firm and you aren’t sinking in much. Use snowshoes in subarctic or forested regions, where the snow can be soft and deep. Snowshoes are also better than skis in broken sea ice or bouldery valleys, where maneuverability is paramount. In deep snow, snowshoes partly pack down a trail for the sled. Skis cannot.
Cadence
This may be obvious, but whether walking, skiing, or snowshoeing, the faster your legs move, the more ground you cover. We all have different natural paces, however. Some of us are amblers. Others move their legs with the swiftness of a sewing machine needle.
My natural hauling pace (walking) on good snow is very quick, 112-120 steps/minute. One otherwise wonderful partner of mine was a saunterer and never surpassed 90 steps/minute. At that cadence, you will never cover 35km in a day. For a slow walker, 20, 25km/day is usually the most you can hope for, even if you put in 10 or 11 hours.
My skiing cadence with a sled is about 90 steps/minute, which is one reason why I prefer walking.
To improve or maintain cadence, it may help to listen to music as you go. Find a few songs that do it for you and put them on repeat. For example, I find that the beat of Bonnie Tyler’s oldie It’s a Heartbreak is perfect for maintaining a high-cadence sledding pace.
Uphills

Sleds are not made for going uphill by human power. As much as possible, avoid hills in your route selection. Gradual slopes are okay but sometimes short, steep sections are unavoidable.
Here, there are three techniques. First, if the slope is gentle or your sled is light enough, you may be able to manage it yourself. Plant both ski poles ahead of you, then walk uphill one or two paces to them. Replant them forward, side by side, and repeat. Depending on how hard or soft the snow is, you may need to remove skis or put on snowshoes with crampons.
Second, if the hill is too much for you alone, you and your partner(s) can clip into one sled at a time and haul it uphill together, or your partner can help by pushing from behind.

Third, if the hill is just too steep or too icy for your load, partly unload the sled and shuttle the gear up in stages. This is one reason why my custom food duffel has backpack straps.
Downhills

Sleds are more fun going downhill, but they can also injure you. Depending on the hill, you can unclip and let it run downhill by itself.
You can also put a sled brake underneath the sled. This is a loop of climbing rope or webbing placed underneath the sled, perpendicular to the runners, and secured on top of the sled. This works well on average polar snow, although if the snow is super-hard or icy, it won’t retard the sled enough.
Finally, you can sit astride the sled, or if the hill is too steep, ride it side-saddle to let your body slow it down, as in the above photo.
Pulling wands vs rope/webbing

Rigid pulling wands are a pain on the flats. A loop of rope or webbing lets you walk back to the sled for a drink of water or to change layers without removing your harness. But if you expect to do significant downhills in real mountains, or God forbid, traverse sidehills, wands are essential.
When a couple of local mountaineers and I circumskied Mount Logan in the Yukon a few years ago, my companions had the alpine savvy to use a wand system. Most of the time, both systems were fine. But at the high point of our 240km journey, we skied down a mountain from 3,300m back to about 2,200m. While I wrestled and wrangled an unruly steer, they skied down in lovely turns, in a fraction of the time that it took me.
Slush!

On lakes and streams, water sometimes wells up through cracks in the ice and settles on top of the snow or just under it. You may think that this slush, which freezes immediately on your sled, will flake easily off a slick Gelcoat hull. Alas, you will make that mistake only once. You must stop and laboriously scrape the frozen slush off. It takes ages. Avoid slush at all costs.
Extra hauling loop

On the flats, I extend my hauling distance from the sled by clipping an extra loop of webbing onto the trace attached to the sled itself. (You can use a light carabiner, although a 1″ Fastex clip usually survives an expedition.) This longer trace lessens the hauling angle, so you don’t lose as much effort pulling the sled upward. For those who remember their high school geometry, it minimizes the upward vector.
When you encounter obstacles that require precise maneuvering, such as a field of rough sea ice, remove the extra length.
Because this long length doesn’t look good in photos, I always take off the supplementary loop first. This grab shot of a partner with a similar extension is the only one I have.