Although I’ve done many expeditions to both the North and South Poles, both as an independent traveler and a guide, every fresh trip brings up new gear ideas. There are also old, tried-and-true standards that I have used for years. As I begin the South Pole season, let’s take a look at my gear. Today: Skis and ski skins for polar travel.
One note: Proper gear is just one aspect of polar travel. Developing skills, planning and logistics, understanding the polar environment, and knowing how to minimize risk are all equally important. If you would like to fast-track your development as a polar traveler, consider hiring an IPGA Polar Expedition Guide.
Skis
The choice of ski comes down to a few factors: mode of travel, what’s on the market, surface, and skiing ability. Here, I won’t be getting into any technicalities about construction. This is about general principles.
Snowkiters typically use an alpine ski, usually quite long to span sastrugi, but ordinary manhaulers will opt for a cross-country (nordic) ski. Such a ski has a camber, which is the arch you see under the ski when it sits unweighted on the ground. When weighted by a skier, the ski sits flat on the snow and either permits forward glide or, if the base has a pattern, wax, or skin, it provides grip.
It’s this glide and grip that polar travelers need in equal measure. Too much glide and attempting to drag a heavy sled leads to backslipping. Too little glide saps our energy trying to push a ski across the snow. Most of us use skins for grip.
Below, you can see the tip widths of some of my skis. Far left is an old Karhu XCD GT that I used to ski to the South Pole in the 1990s. Tip, waist, and tail dimensions are 62, 54, and 59mm respectively. Its length is 205cm. A long and narrow ski, and a sign of those times.

Different models
The second ski is a Karhu Catamount that I used between Russia and the North Pole in 2002. It measures 85, 70, and 80mm. It is a wider ski for convoluted terrain, with a wider surface to spread on thin ice.
In the Aussie alps, I use a Rossignol BC, third from left. It measures 110, 78, and 95mm. This wider ski with a greater discrepancy between the width of the waist and tip/tail (side cut) is preferable for backcountry skiing.
For my upcoming icecap trip, I’m on a Madshus Eon, far right, measuring 83, 62, and 70mm, 175cm in length. Madshus and Åsnes seem to have cornered this little market.
For ice cap expeditions in Greenland and Antarctica, you want a relatively long and narrow ski. We used to say that ski length should be the height of the wrist on your upstretched arm, but that is a bit long these days. On our guided Svalbard and North Pole trips, we use wider and shorter skis. These are slower but ultimately easier for novices to balance on.
The longer the ski, the better the glide, but maneuverability becomes an issue among pressure ridges or big sastrugi.
All these skis have metal edges for robustness and edging capability.
Ski skins
Ski skins attach to the undersurface of a ski with a kind of reusable glue that doesn’t freeze in the cold. They are critical for traction. A base pattern or wax alone can’t give enough grip to move a heavy sled across a snowy surface.
The plush of the skin (one-way fibers, like the fur on a dog) allows it to slide forward in one direction and grip in the other. For superior glide, use a plush of mohair (angora goat hair). For durability, choose nylon, or use a mix of both.
My preference on a long expedition is durability over glide because so many other factors (ski ability, sled weight, surface, slope) conspire to disrupt glide. And nylon skin technology is constantly improving glide performance while retaining grip. I can’t see goats coming to that party!
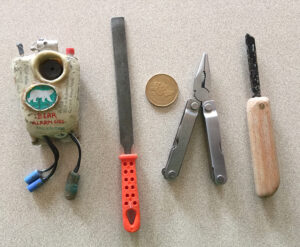
I buy 140mm wide nylon skins and cut them into 45mm strips (with a homemade skin-cutting jig) to cover the length of my skis. I’ve never needed any more than 45mm. Narrow skins also allow a bit of glide across the length of the exposed base. I’ve used skins as slender as 30mm.

Cutting skins to size.
Half-skins
Half-skins might be a good option. These only cover the grip pocket under the camber, allowing superior glide. You typically put them on as the sled lightens over the weeks and a full-length grip is no longer required.
However, half-skins do pose a few problems. On a polar expedition, we often deal with terrain where only the tip and tail touch the snow: pressure ridges, cracks in sea ice, sastrugi, or a steep slope. I have seen expert skiers reduced to tears trying to negotiate sastrugi with half-skins. Kicker connections are also a bit fiddly. Some attach through a hole in the skis, a potential weak point.
Attaching skins
There are many skin manufacturers to choose from and they all claim the latest plush, glue, and connector technology. But many users give them mediocre feedback. I’m interested to know if anyone has completed a long (1,000km plus) and cold (continuous -25°C) expedition and not had trouble with glue drying out.
This is my method for worry-free skin application on a long polar expedition.
Skins normally attach to a ski using a special pre-applied glue that allows them to be removed and re-attached. But this glue tends to dry out, and the sides and tail of the skin begin to peel off the base. You could bring extra glue, but re-gluing skins in the field is messy.
I screw my skins to the base at the tip, tail, and two midpoints. The Phillips-head screws are very short and barely penetrate the core of the ski. The pan head sits within the plush, so there is no effect on glide. Your glue will probably hold on shorter trips, but for long expeditions, I’d rather add 20 screws at 7g total than suffer an avoidable headache. And, starting with a heavy sled and usually uphill (Antarctica and Greenland), you’re going to need those full-length skins for a while.

A screwed-on skin.
Tips for attaching skins
Connect the tip using a solid fixture like a wire bail. Don’t use stretchy rubber tips, they get knocked off. The rear is a bit trickier, as skis usually double as tent stakes. You can damage the skin/connection by planting your ski in the snow. I typically taper the skin at the back, wrap it over and screw it to the top.
Changing over to half-skins is a bit fiddly if your skins are screwed on, but you only need to do it once. Kickers definitely offer better glide. Just be sure other factors don’t stymie it. They commonly connect through holes in the ski forward of the binding and have no rear connector.
In warmer environments, snow can ball up on the plush, and this is a major pain. Some bring some skin wax for this, but I have successfully used butter and olive oil to lubricate skins in Greenland and Patagonia.